Synchronize between two clusters
NebulaGraph supports data synchronization from a primary cluster to a secondary cluster in almost real-time. It applies to scenarios such as disaster recovery and load balancing, and helps reduce the risk of data loss and enhance data security.
Enterpriseonly
This feature applies to the Enterprise Edition only.
Synchronization workflow
The synchronization works as follows:
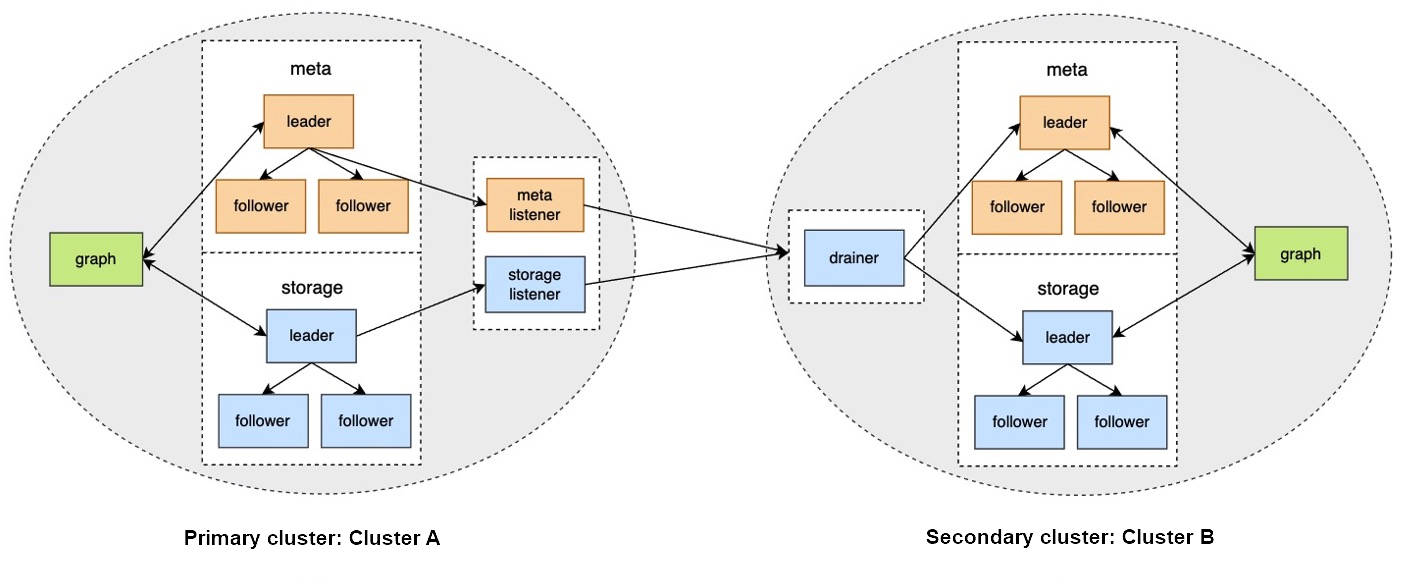
- The primary cluster sends any data written into it to the Meta listener or the Storage listener in the form of WALs or snapshots.
- The listener sends the data to the drainer in the form of WALs.
- The drainer sends the data to the partitions of the secondary cluster through the Meta client or the Storage client.
Applicable Scenarios
- Remote disaster recovery: Data synchronization enables cross-data-center or cross-city disaster recovery.
- Data migration: The migration can be implemented by synchronizing data and then switching cluster roles, without stopping the service.
- Read/Write splitting: Enable only writing on the primary cluster and only reading on the secondary cluster to lower the system load, and improve stability and usability.
Precautions
- The synchronization is based on graph spaces, i.e., from one graph space in the primary cluster to another in the secondary cluster.
-
About the synchronization topology, NebulaGraph:
- Supports synchronizing from one primary cluster to one secondary cluster, but not multiple primary clusters to one secondary cluster.
- Supports chained synchronization but not synchronization from one primary cluster to multiple secondary clusters directly. An example of chained synchronization is from cluster A to cluster B, and then cluster B to cluster C.
- The synchronization is implemented asynchronously, but with low latency.
- The Meta listener listens to the Meta Service and the Storage listener listens to the Storage Service. Do not mix them up.
- One graph space can have one Meta listener and one to multiple Storage listeners. These listeners can work with one to multiple drainers:
- One listener with one drainer.
- Multiple listeners with one drainer.
- Multiple listeners with multiple drainers.
- The machines where the listeners and drainers run must have enough disk space to store the WAL or snapshot files.
- If the target graph space in the secondary cluster has data before the synchronization starts, data conflicts or inconsistencies may happen during the synchronization. It is recommended to keep the target graph space empty.
Prerequisites
-
Prepare at least two machines to deploy the primary and secondary clusters, the listeners, and the drainer.
The listener and drainer can be deployed in a standalone way, or on the machines hosting the primary and secondary clusters. The latter way can increase the machine load and decrease the service performance.
- Prepare the license file for the NebulaGraph Enterprise Edition.
Test environment
The test environment for the operation example in this topic is as follows:
- The primary cluster runs on the machine with the IP address 192.168.10.101. The cluster has one nebula-graphd process, one nebula-metad process, and one nebula-storaged process.
-
The secondary cluster runs on the machine with the IP address 192.168.10.102. The cluster has one nebula-graphd process, one nebula-metad process, and one nebula-storaged process.
Note
The primary and secondary clusters can have different cluster specifications, such as different numbers of machines, service processes, and data partitions.
- The processes for the Meta and Storage listeners run on the machine with the IP address 192.168.10.103.
- The process for the drainer runs on the machine with the IP address 192.168.10.104.
Steps
Step 1: Set up the clusters, listeners, and drainer
-
Install NebulaGraph on all the machines.
For installation instructions, see Install NebulaGraph.
-
Modify the configuration files on all the machines.
Note
For newly installed services, remove the suffix
.defaultor.productionof a configuration template file in theconfdirectory to make it take effect.- On the primary and secondary cluster machines, modify
nebula-graphd.conf,nebula-metad.conf, andnebula-storaged.conf. In all three files, set real IP addresses forlocal_ipinstead of127.0.0.1, and set the IP addresses and ports for their own nebula-metad processes as themeta_server_addrsvalues. Innebula-graphd.conf, setenable_authorize=true.
- On the Meta listener machine, modify
nebula-metad-listener.conf. Set the IP addresses and ports of the primary cluster's nebula-metad processes formeta_server_addrs, and those of the listener process formeta_sync_listener.
- On the Storage listener machine, modify
nebula-storaged-listener.conf. Set the IP addresses and ports of the primary cluster's nebula-metad processes formeta_server_addrs.
- On the drainer machine, modify
nebula-drainerd.conf. Set the IP addresses and ports of the secondary cluster's nebula-metad processes formeta_server_addrs.
For more information about the configurations, see Configurations.
- On the primary and secondary cluster machines, modify
-
On the machines of the primary cluster, secondary cluster, and listeners, upload the license files into the
share/resources/directories in the NebulaGraph installation directories. -
Go to the NebulaGraph installation directories on the machines and start the needed services.
- On the primary and secondary machines, run
sudo scripts/nebula.service start all.
- On the Meta listener machine, run
sudo bin/nebula-metad --flagfile etc/nebula-metad-listener.conf.
- On the Storage listener machine, run
sudo bin/nebula-storaged --flagfile etc/nebula-storaged-listener.conf.
- On the drainer machine, run
sudo scripts/nebula-drainerd.service start.
- On the primary and secondary machines, run
-
Log into the primary cluster, add the Storage hosts, and check the status of the listeners.
# Add the Storage hosts first. nebula> ADD HOSTS 192.168.10.101:9779; nebula> SHOW HOSTS STORAGE; +------------------+------+----------+-----------+--------------+----------------------+ | Host | Port | Status | Role | Git Info Sha | Version | +------------------+------+----------+-----------+--------------+----------------------+ | "192.168.10.101" | 9779 | "ONLINE" | "STORAGE" | "xxxxxxx" | "ent-3.1.0" | +------------------+------+----------+-----------+--------------+----------------------+ # Check the status of the Storage listener. nebula> SHOW HOSTS STORAGE LISTENER; +------------------+------+----------+--------------------+--------------+----------------------+ | Host | Port | Status | Role | Git Info Sha | Version | +------------------+------+----------+--------------------+--------------+----------------------+ | "192.168.10.103" | 9789 | "ONLINE" | "STORAGE_LISTENER" | "xxxxxxx" | "ent-3.1.0" | +------------------+------+----------+--------------------+--------------+----------------------+ # Check the status of the Meta listener. nebula> SHOW HOSTS META LISTENER; +------------------+------+----------+-----------------+--------------+----------------------+ | Host | Port | Status | Role | Git Info Sha | Version | +------------------+------+----------+-----------------+--------------+----------------------+ | "192.168.10.103" | 9569 | "ONLINE" | "META_LISTENER" | "xxxxxxx" | "ent-3.1.0" | +------------------+------+----------+-----------------+--------------+----------------------+ -
Log into the secondary cluster, add the Storage hosts, and check the status of the drainer.
nebula> ADD HOSTS 192.168.10.102:9779;
nebula> SHOW HOSTS STORAGE;
+------------------+------+----------+-----------+--------------+----------------------+
| Host             | Port | Status   | Role      | Git Info Sha | Version              |
+------------------+------+----------+-----------+--------------+----------------------+
| "192.168.10.102" | 9779 | "ONLINE" | "STORAGE" | "xxxxxxx"    | "ent-3.1.0"          |
+------------------+------+----------+-----------+--------------+----------------------+

nebula> SHOW HOSTS DRAINER;
+------------------+------+----------+-----------+--------------+----------------------+
| Host             | Port | Status   | Role      | Git Info Sha | Version              |
+------------------+------+----------+-----------+--------------+----------------------+
| "192.168.10.104" | 9889 | "ONLINE" | "DRAINER" | "xxxxxxx"    | "ent-3.1.0"          |
+------------------+------+----------+-----------+--------------+----------------------+
Step 2: Set up the synchronization
-
Log into the primary cluster and create a graph space
basketballplayer.nebula> CREATE SPACE basketballplayer(partition_num=15, \ replica_factor=1, \ vid_type=fixed_string(30)); -
Use the graph space
basketballplayerand register the drainer service.nebula> USE basketballplayer; # Register the drainer service. nebula> SIGN IN DRAINER SERVICE(192.168.10.104:9889); # Check if the drainer service is successfully signed in. nebula> SHOW DRAINER CLIENTS; +-----------+------------------+------+ | Type | Host | Port | +-----------+------------------+------+ | "DRAINER" | "192.168.10.104" | 9889 | +-----------+------------------+------+ -
Configure the listener service.
# replication_basketballplayer is the synchronization target. It will be created in the following steps. nebula> ADD LISTENER SYNC \ META 192.168.10.103:9569 \ STORAGE 192.168.10.103:9789 \ TO SPACE replication_basketballplayer; # Check the listener status. nebula> SHOW LISTENER SYNC; +--------+--------+------------------------+--------------------------------+----------+ | PartId | Type | Host | SpaceName | Status | +--------+--------+------------------------+--------------------------------+----------+ | 0 | "SYNC" | ""192.168.10.103":9569" | "replication_basketballplayer" | "ONLINE" | | 1 | "SYNC" | ""192.168.10.103":9789" | "replication_basketballplayer" | "ONLINE" | | 2 | "SYNC" | ""192.168.10.103":9789" | "replication_basketballplayer" | "ONLINE" | | 3 | "SYNC" | ""192.168.10.103":9789" | "replication_basketballplayer" | "ONLINE" | | 4 | "SYNC" | ""192.168.10.103":9789" | "replication_basketballplayer" | "ONLINE" | | 5 | "SYNC" | ""192.168.10.103":9789" | "replication_basketballplayer" | "ONLINE" | | 6 | "SYNC" | ""192.168.10.103":9789" | "replication_basketballplayer" | "ONLINE" | | 7 | "SYNC" | ""192.168.10.103":9789" | "replication_basketballplayer" | "ONLINE" | | 8 | "SYNC" | ""192.168.10.103":9789" | "replication_basketballplayer" | "ONLINE" | | 9 | "SYNC" | ""192.168.10.103":9789" | "replication_basketballplayer" | "ONLINE" | | 10 | "SYNC" | ""192.168.10.103":9789" | "replication_basketballplayer" | "ONLINE" | | 11 | "SYNC" | ""192.168.10.103":9789" | "replication_basketballplayer" | "ONLINE" | | 12 | "SYNC" | ""192.168.10.103":9789" | "replication_basketballplayer" | "ONLINE" | | 13 | "SYNC" | ""192.168.10.103":9789" | "replication_basketballplayer" | "ONLINE" | | 14 | "SYNC" | ""192.168.10.103":9789" | "replication_basketballplayer" | "ONLINE" | | 15 | "SYNC" | ""192.168.10.103":9789" | "replication_basketballplayer" | "ONLINE" | +--------+--------+------------------------+--------------------------------+----------+ -
Log into the secondary cluster and create graph space
replication_basketballplayer.nebula> CREATE SPACE replication_basketballplayer(partition_num=15, \ replica_factor=1, \ vid_type=fixed_string(30)); -
Use
replication_basketballplayerand configure the drainer service.nebula> USE replication_basketballplayer; # Configure the drainer service. nebula> ADD DRAINER 192.168.10.104:9889; # Check the drainer status. nebula> SHOW DRAINERS; +-------------------------+----------+ | Host | Status | +-------------------------+----------+ | ""192.168.10.104":9889" | "ONLINE" | +-------------------------+----------+ -
Set the target graph space
replication_basketballplayeras read-only to avoid data inconsistency.Note
This step only sets the target graph space, not other graph spaces.
# Set the working graph space as read-only.
nebula> SET VARIABLES read_only=true;

# Check the read_only status of the working graph space.
nebula> GET VARIABLES read_only;
+-------------+--------+-------+
| name        | type   | value |
+-------------+--------+-------+
| "read_only" | "bool" | true  |
+-------------+--------+-------+
Step 3: Validate the data
-
Log into the primary cluster, create the schema, and insert data.
nebula> USE basketballplayer; nebula> CREATE TAG player(name string, age int); nebula> CREATE EDGE follow(degree int); nebula> INSERT VERTEX player(name, age) VALUES "player100":("Tim Duncan", 42); nebula> INSERT VERTEX player(name, age) VALUES "player101":("Tony Parker", 36); nebula> INSERT EDGE follow(degree) VALUES "player101" -> "player100":(95); -
Log into the secondary cluster and validate the data.
nebula> USE replication_basketballplayer;
nebula> SUBMIT JOB STATS;
nebula> SHOW STATS;
+---------+------------+-------+
| Type    | Name       | Count |
+---------+------------+-------+
| "Tag"   | "player"   | 2     |
| "Edge"  | "follow"   | 1     |
| "Space" | "vertices" | 2     |
| "Space" | "edges"    | 1     |
+---------+------------+-------+

nebula> FETCH PROP ON player "player100" \
        YIELD properties(vertex);
+-------------------------------+
| properties(VERTEX)            |
+-------------------------------+
| {age: 42, name: "Tim Duncan"} |
+-------------------------------+

nebula> GO FROM "player101" OVER follow \
        YIELD dst(edge);
+-------------+
| dst(EDGE)   |
+-------------+
| "player100" |
+-------------+
Stop/Restart data synchronization
The listener continuously sends the WALs to the drainer during data synchronization.
To stop data synchronization, run the stop sync command. The listener stops sending the WALs to the drainer.
To restart data synchronization, run the restart sync command. The listener sends the WALs accumulated during the period when the synchronization is stopped to the drainer. If the WALs are lost, the listener pulls the snapshot from the primary cluster and synchronizes data again.
Switch between primary and secondary clusters
To migrate data or implement disaster recovery, manually switch between the primary and secondary clusters.
Note
Before the switching, set up a listener for the new primary cluster, and a drainer for the new secondary cluster. In the following example, the listener has IP address 192.168.10.105 and drainer 192.168.10.106.
-
Log into the primary cluster and remove the old drainer and listener.
nebula> USE basketballplayer; nebula> SIGN OUT DRAINER SERVICE; nebula> REMOVE LISTENER SYNC; -
Set the working graph space as read-only to avoid data inconsistency.
nebula> SET VARIABLES read_only=true; -
Log into the secondary cluster, disable read-only, and remove the old drainer.
nebula> USE replication_basketballplayer; nebula> SET VARIABLES read_only=false; nebula> REMOVE DRAINER; -
Change the secondary cluster to the new primary cluster.
nebula> SIGN IN DRAINER SERVICE(192.168.10.106:9889); nebula> ADD LISTENER SYNC META 192.168.10.105:9569 STORAGE 192.168.10.105:9789 TO SPACE basketballplayer; nebula> REMOVE DRAINER; -
Log into the old primary cluster and change it to the new secondary cluster.
nebula> USE basketballplayer;
# Disable read-only for the working graph space, otherwise adding drainer fails.
nebula> SET VARIABLES read_only=false;
nebula> ADD DRAINER 192.168.10.106:9889;
nebula> SET VARIABLES read_only=true;
FAQ
Can the pre-existent data in the primary cluster be synchronized to the secondary cluster?
Yes. After receiving the WAL from the listener, if the drainer finds that the data to be updated does not exist in the secondary cluster, it starts the synchronization of the complete data set.
Will the pre-existent data in the secondary cluster affect the synchronization?
If the pre-existent data in the secondary cluster is a subset of the data in the primary cluster, the data in the primary and secondary clusters will eventually become consistent through synchronization. If there is any pre-existent data (not a subset of the data in the primary cluster) in the secondary cluster before the synchronization, the data may be lost after the synchronization. It is recommended to use a secondary cluster without data for synchronization.
Will the pre-existent schema information in the secondary cluster affect the synchronization?
The pre-existent schema information must not conflict with the schema of the primary cluster. Otherwise, it will be overwritten, and related data in the secondary cluster might become invalid.
Should the number of machines, replicas, and partitions in the primary and secondary clusters be the same?
No. The synchronization is based on graph spaces, not other elements such as partitions and replicas. The primary and secondary clusters do not need to have the exact specifications.
Does altering the schema in the primary cluster affect the synchronization?
Altering the schema may increase the synchronization latency.
The schema data is synchronized through the Meta listener, while the vertex/edge data is through the Storage listener. When synchronizing the vertex/edge data, the system checks the schema version of the data. If the system finds that the version number of the schema is greater than that in the secondary cluster, it pauses the vertex/edge data update, and updates the schema data first.
How to deal with synchronization failures?
Fix the problems in the cluster, and then the synchronization will be automatically restored.
- If problems have happened in the primary cluster, the synchronization continues when the problems are fixed and the primary cluster restarts.
- If problems have happened in the secondary cluster, listeners, or drainers, when the problems are fixed, the services that had the problems will receive the WALs accumulated from its upstream and the synchronization will continue working. If the faulty machine is replaced with a new one, all the data of the synchronization services on the faulty machine must be copied to the new machine. Otherwise, the synchronization of the complete data set will start automatically.
How to check the data synchronization status and progress?
There is no tool specially designed to show the real-time status and overall progress of the synchronization for now.