Workflow example
This topic describes how to create a simple workflow.
Prerequisites
- The data source is ready. The data source can be data in NebulaGraph or CSV files on HDFS.
- The resource has been configured.
Add workflow
With the result of the MATCH statement MATCH (v1:player)--(v2) RETURN id(v1), id(v2); as the input of the PageRank algorithm, the following will introduce how to create a simple workflow.
-
At the top of the Explorer page, click Workflow.
-
In the Workflows tab, click New workflow to enter the process canvas page.
-
In the component library list on the left side of the process canvas page, select Query->Query and drag it onto the canvas. Click the graph query component and set the following parameters in the configuration panel on the right side.
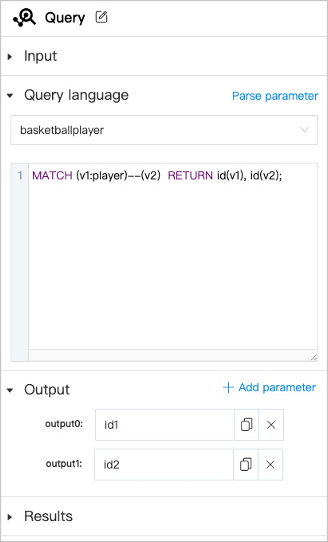
Parameters Description Query Click  to modify the component name to identify the component.
Input Set custom parameters that can be used for parameterized query. Click Add parameter to add more custom parameters. Query language Select the graph space to execute the nGQL statement and fill in the nGQL statement. Click Parse Parameter to display the returned column name in the Output. Output The column name returned by parsing the query language. You can change the name, which is equivalent to aliasing the column with AS.Results Set the saving project of the result. To call the results expediently for other algorithms, the results of the graph query component can only be saved in the HDFS. Note
The connection anchors are shown in yellow, indicating that it is optional and can be set by user or provided by any other component.
-
In the component library list on the left side of the process canvas page, select Node importance->PageRank and drag it onto the canvas. Connect the anchor
output0to the anchorinput0and the anchoroutput1to the anchorinput1.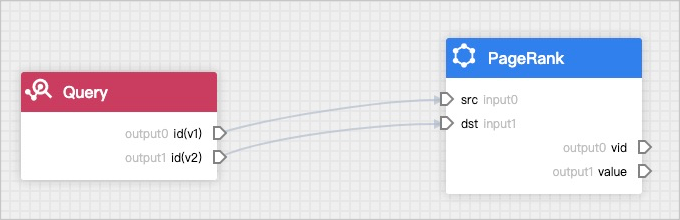
-
Click the graph computing component and set the following parameters in the configuration panel on the right side.
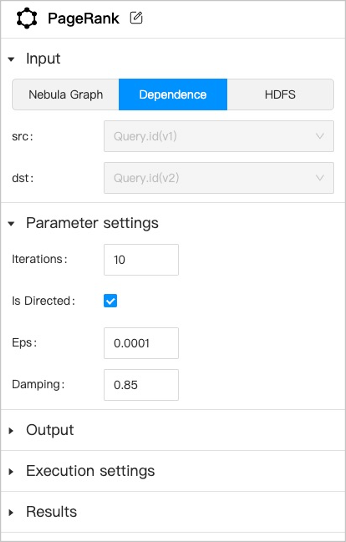
Parameters Description PageRank Click to modify the component name to identify the component.Input Three data sources are supported as input.
NebulaGraph: Users must select one graph space and corresponding edge types.
Dependence: The system will automatically recognize the data source according to the connection of the anchor.
HDFS: Users must select HDFS and fill in the relative path of the data source file.Parameter settings Set the parameters of the graph algorithm. The parameters of different algorithms are different. Some parameters can be obtained from any upstream component where the anchor are shown in yellow. Output Display the column name of the graph computing results. The name can not be modified. Execution settings Machine num: The number of machines executing the algorithm.
Processes: The total number of processes executing the algorithm. Allocate these processes equally to each machine based on the number of machines.
Threads: How many threads are started per process.Results Set the restoration path of the results in HDFS or NebulaGraph.
HDFS: The save path is automatically generated based on the job and task ID.
NebulaGraph: Tags need to be created beforehand in the corresponding graph space to store the results. For more information about the properties of the tag, see Algorithm overview.
Some algorithms can only be saved in the HDFS. -
Click
next to the automatically generated workflow name at the upper left corner of the canvas page to modify the workflow name, and click Run at the upper right corner of the canvas page. The job page is automatically displayed to show the job progress. You can view the result after the job is completed. For details, see Job management.Note
When you click Run, the workflow will be automatically saved. If you do not perform graph computing and only make modifications, click
 to save the modification, or click
  to save the workflow as a new workflow.