Import data
After CSV files of data and a schema are created, you can use the Import page to batch import vertex and edge data into Nebula Graph for graph exploration and data analysis.
Prerequisites
To batch import data, do a check of these:
- Studio is connected to Nebula Graph.
- A schema is created.
- CSV files meet the demands of the Schema.
- Your account has privilege of GOD, ADMIN, DBA, or USER.
Procedure
To batch import data, follow these steps:
-
In the toolbar, click the Import tab.
-
On the Select Space page, choose a graph space name. In this example, basketballplayer is used. And then click the Next button.
-
On the Upload Files page, click the Upload Files button and then choose CSV files. In this example,
edge_serve.csv,edge_follow.csv,vertex_player.csv, andvertex_team.csvare chosen.Note
You can choose multiple CSV files at the same time. The CSV file used in this article can be downloaded in the Design a schema.
-
On the Select Files page, do a check of the file size and click Preview or Delete in the Operations column to make sure that all source data is correct. And then click the Next button.
-
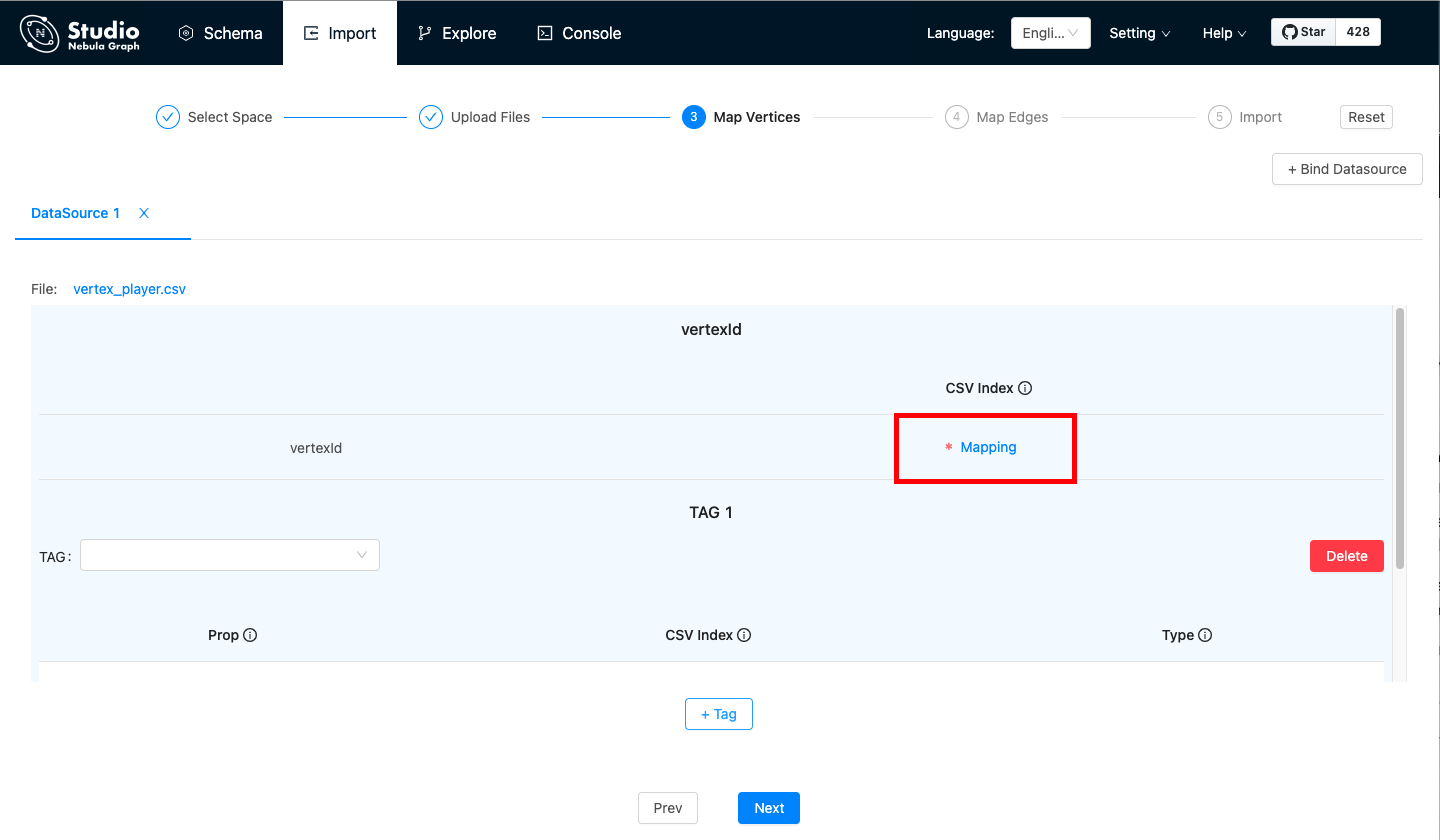
On the Map Vertices page, click the + Bind Datasource button, and in the dialog box, choose a CSV file. In this example,
vertex_player.csvorvertex_team.csvis chosen. -
In the DataSource X tab, click the + Tag button.
-
In the vertexId section, do these operations:
a. In the CSV Index column, click Mapping.

b. In the dialog box, choose a column from the CSV file. In this example, the only one cloumn of
vertex_player.csvis chosen to generate VIDs representing players and theplayerIDcolumn ofvertex_player.csvis chosen to generate VIDs representing players.!!! Note
In the same graph space, the VID is always unique and cannot be repeated. For VID information, see [VID](../../1.introduction/3.vid.md) "Click to enter the Nebula Graph Manual". -
In the TAG 1 section, do these operations:
a. In the TAG drop-down list, choose a tag name. In this example, player is used for thevertex_player.csvfile, and team is used for thevertex_team.csvfile.b. In the property list, click Mapping to choose a data column from the CSV file as the value of a property. In this example, for the player tag, choose Column 1 for the
ageproperty and set its type to int. And choose Column 2 for thenameproperty and set its type to string.
-
(Optional) If necessary, repeat Step 5 through Step 8 for more tags.
-
When the configuration is done, click the Next button.
When Config validation was successful prompts, data mapping for the vertices is successful. -
On the Map Edges page, click the + Bind Datasource button, and in the dialog box, choose a CSV file. In this example, the
edge_follow.csvfile is chosen. -
In the Type drop-down list, choose an edge type name. In this example, follow is chosen.
-
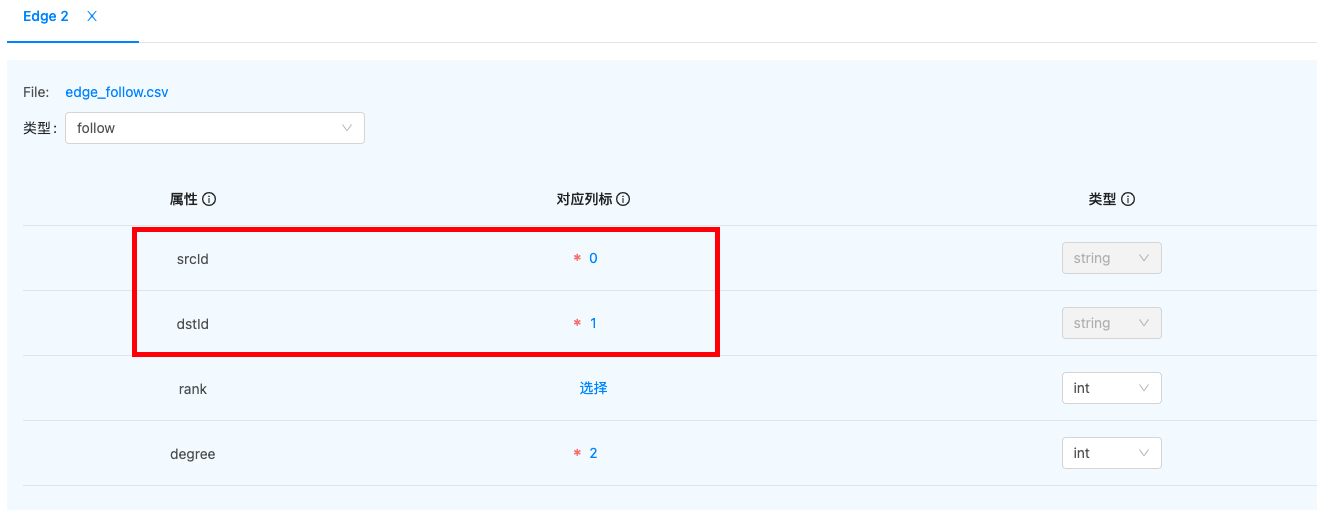
In the property list, click Mapping to choose a column from the
edge_follow.csvfile as values of a property for the edges. srcId and dstId are the VIDs of the source vertex and destination vertex of an edge. In this example, srcId must be set to the VIDs of the player and dstId must be set to the VIDs of another player. Rank is optional.
-
When the configuration is done, click the Next button.
-
On the Import page, click the Start Import button. On the log window, you can see the import progress. The consumed time depends on the data volume. During data import, you can click the Stop Import button to stop data import. When the log window shows information as follows, the data import is done.

Next to do
When the data are imported to v2.5.0, you can query graph data.