Manage Zones
Enterpriseonly
This feature is only available in the NebulaGraph Enterprise Edition.
The Zone is a logical rack of storage nodes in a NebulaGraph cluster. It divides multiple storage nodes into manageable logical areas to achieve resource isolation. At the same time, you can control the Graph service to access the replica data in the specified Zone to reduce traffic consumption and improve access efficiency. This article describes how to use the Zone feature.
Principle
Within NebulaGraph, you can set up multiple Zones, with each Zone containing one or more Storage nodes. When creating a graph space, the system automatically recognizes these set Zones and stores graph space data on the Storage nodes within these Zones.
It's important to note that when creating a graph space, you need to specify the number of replicas for data partitioning. At this point, the specified number of partition replicas and the number of set Zones must be equal, otherwise, the graph space cannot be created. This is because NebulaGraph evenly distributes the replicas of every graph space partition across these set Zones.
Since each Zone contains a complete set of graph space data partitions, at least one Storage node is required within each Zone to store these data partitions.
The partition replicas in NebulaGraph achieve strong consistency through the Raft protocol. It's recommended to use an odd number of partition replicas, and therefore, it's also suggested to set an odd number of Zones.
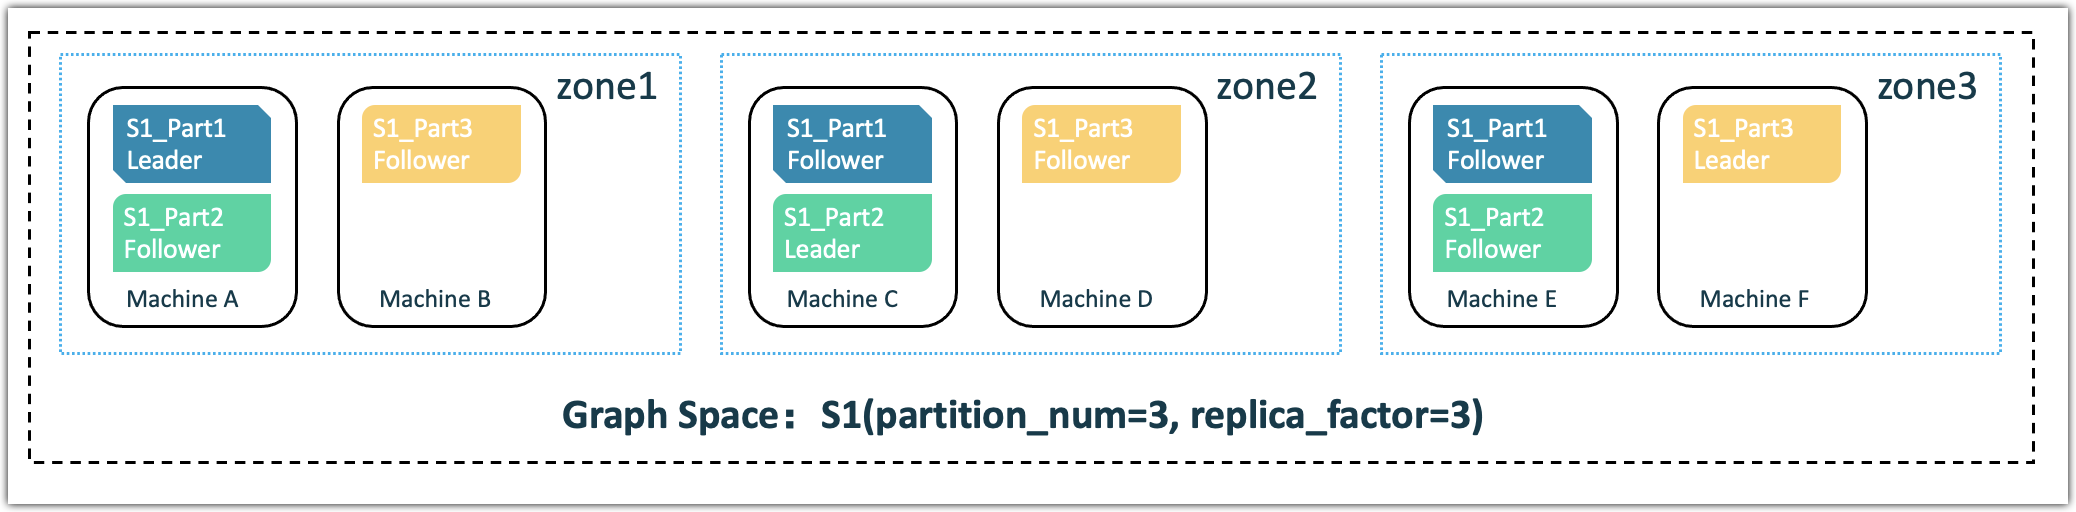
Taking the following picture as an example, when creating a graph space (S1), the data is partitioned into 3 partitions, with 3 replicas for each partition, and the number of Zones is also 3. Six machines hosting the Storage service are paired up and added to these 3 Zones. When creating the graph space, NebulaGraph stores the 3 replicas of each partition evenly across zone1, zone2, and zone3, and each Zone contains a complete set of graph space data partitions (Part1, Part2, and Part3).
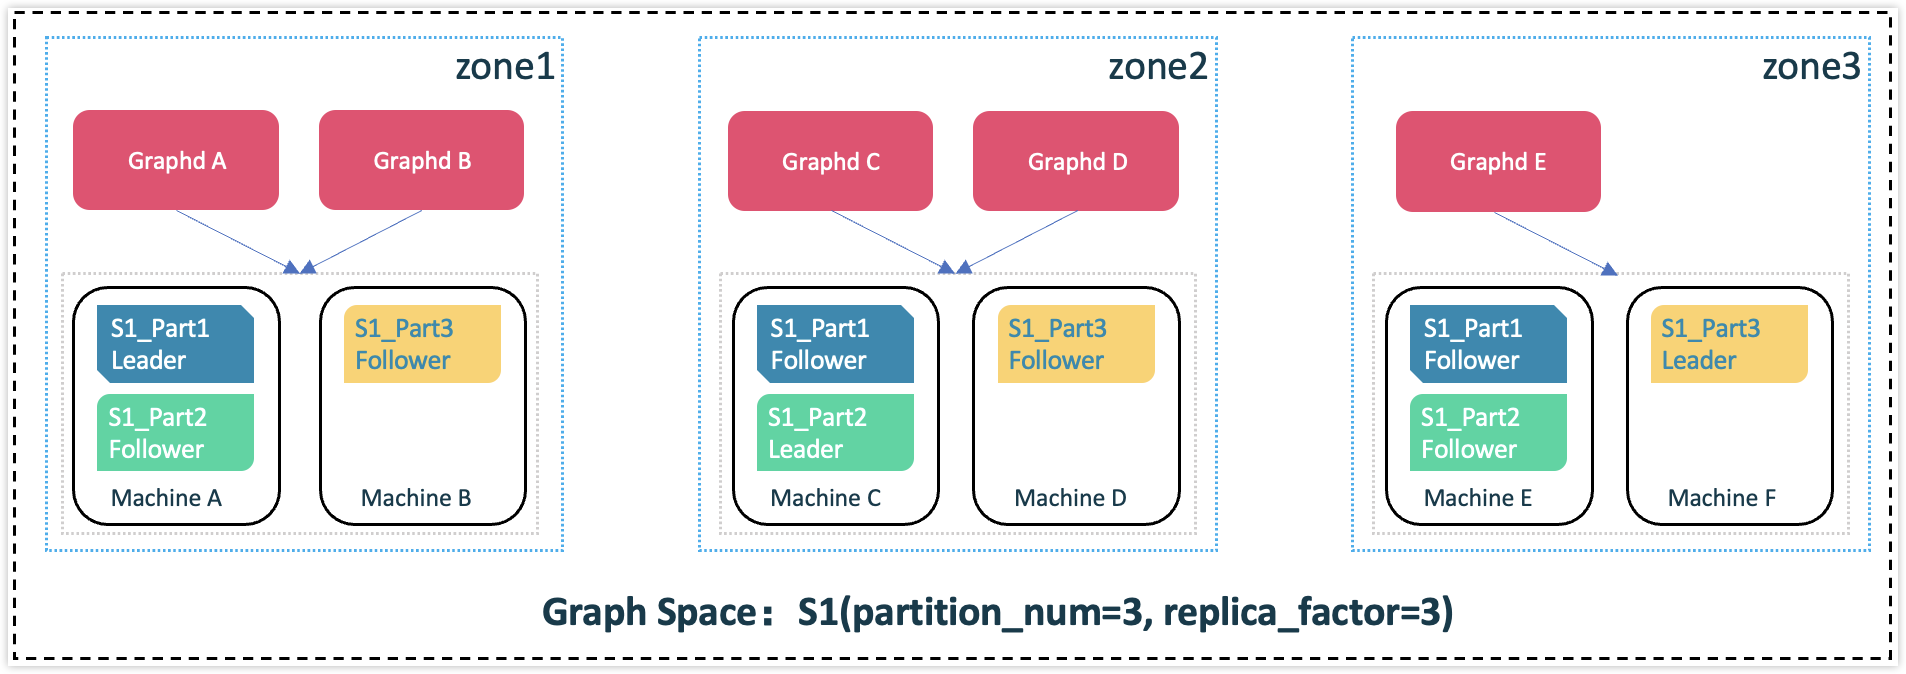
To reduce cost of cross-Zone network traffic, and increase data transfer speed (Intra-zone network usually has a lower latency than inter-zone network), you can configure the Graph service to prioritize intra-zone data access. Each Graphd will then prioritize to access the partition replica in the same zone as specified by Graphd if there is any. As an example, suppose Graphd A and Graphd B are located in zone1, Graphd C and Graphd D are in zone2, and Graphd E is in zone3. You can configure Graphd A and Graphd B to prioritize accessing data in zone1, Graphd C and Graphd D to prioritize accessing data in zone2, and Graphd E to prioritize accessing data in zone3. This helps reduce the cost of cross-zone network traffic and improves data transfer speed.
Scenarios
- Rolling upgrade. You need to stop one or more servers to update them, and then put them into use again until all servers in the cluster are updated to the new version.
- Cost saving. Allocate graph space data to different Zones, and control the client to access the replica data in the specified Zone to reduce traffic consumption and improve access efficiency.
Notes
- Before enabling the Zone feature, clear any existing data in the cluster. See Enabling Zone for details.
- Each Storage node must belong to one, and only one, Zone. However, a Zone can have multiple Storage nodes. Storage nodes should outnumber or equal Zones.
- The number of Zones must equal the number of partition replicas; otherwise, the graph space cannot be created.
- The number of Zones is recommended to be odd.
- Adjusting the number of Zones isn't allowed.
- Zone name modifications are unsupported.
Enable Zone
-
In the configuration file
nebula-metad.confof the Meta service, set--zone_listto Zone names to be added, such as--zone_list=zone1, zone2, zone3.Danger
Once the value of
--zone_listis configured and the Meta service is started, it cannot be modified, otherwise, the Meta service will fail to restart.Note
- The number of Zones specified in
--zone_listis recommended to be odd and must be less than or equal to the number of Storage nodes. When--zone_listis empty, it indicates that the Zone feature is disabled. - Consider the replica settings when setting the number of Zones, since the number of Zones should match the replica count. For example, with 3 replicas, you must have 3 Zones.
- If the name of a Zone contains special characters (excluding underscores), reserved keywords, or starts with a number, you need to enclose the Zone name in backticks (`) when specifying the Zone name in a query statement; the Zone name cannot contain English periods (.); multiple Zone names must be separated by commas (,).
For more information about the Meta configuration file, see Meta service configuration.
- The number of Zones specified in
-
Restart the Meta service.
Specify intra Zone data access
- Enable the Zone feature. For details, see Enable Zone above.
-
In the configuration file
nebula-graphd.confof the Graph service, add the following configuration:-
Set the
--assigned_zoneto the name of the Zone where the Graphd is assigned, such as--assigned_zone=zone1.Note
- Different Graph services can set different values for
--assigned_zone, but the value of--assigned_zonemust be one of the values in--zone_list. In production, it is recommended to use the actual zone that a Graphd locates to reduce management complexity. Of course, it must be within thezone_list. Otherwise, intra zone reading may not take effect. - The value of
--assigned_zoneis a string and does not support English commas (,). - When
--assigned_zoneis empty, it means reading from leader replicas.
- Different Graph services can set different values for
-
Set
--prioritize_intra_zone_readingtotrueto prioritize intra zone data reading. When reading fails in the Zone specified by--assigned_zone, an error occurs depending on the value ofstick_to_intra_zone_on_failure.Caution
It is recommended that the values of
--prioritize_intra_zone_readingin different Graph services be consistent, otherwise, the load of Storage nodes will be unbalanced and unknown risks will occur.
For details on the Graph configuration, see Graph service configuration.
-
-
Restart the Graph service.
Zone-related commands
Note
Make sure that the Zone feature is enabled and the --zone_list is configured before executing Zone-related commands. For details, see Enable Zone above.
View all Zone information
nebula> SHOW ZONES;
+--------+-----------------+------+
| Name   | Host            | Port |
+--------+-----------------+------+
| "az1"  | "192.168.8.111" | 9779 |
| "az1"  | "192.168.8.112" | 9779 |
| "az2"  | "192.168.8.113" | 9779 |
| "az3"  | "192.168.8.114" | 9779 |
+--------+-----------------+------+
Run SHOW ZONES in the current graph space to view all Zone information. The Zone information includes the name of the Zone, the IP address (or domain name) and the port number of the storage node in the Zone.
View the specified Zone
DESCRIBE ZONE <zone_name>;
DESC ZONE <zone_name>;
For example:
nebula> DESC ZONE az1
+-----------------+------+
| Hosts           | Port |
+-----------------+------+
| "192.168.8.111" | 9779 |
| "192.168.8.112" | 9779 |
+-----------------+------+
Create a space in the specified Zones
The syntax for creating a graph space within a Zone is the same as in Creating Graph Space.
However, during graph space creation, the system automatically recognizes the --zone_list value from the Meta configuration file. If this value is not empty and the number of Zones matches the partition replica count specified by replica_factor, the graph space's replicas will be evenly distributed across the Zones in --zone_list. If the specified replica count doesn't match the number of Zones, graph space creation will fail.
If the value of --zone_list is empty, the Zone feature is not enabled, and the graph space will be created without specifying Zones.
Check the Zones for the specified graph space
DESC SPACE <space_name>;
For example:
nebula> DESC SPACE my_space_1
+----+--------------+------------------+----------------+---------+------------+--------------------+---------+---------+
| ID | Name         | Partition Number | Replica Factor | Charset | Collate    | Vid Type           | Zones   | Comment |
+----+--------------+------------------+----------------+---------+------------+--------------------+---------+---------+
| 22 | "my_space_1" | 10               | 1              | "utf8"  | "utf8_bin" | "FIXED_STRING(30)" | ["az1"] |         |
+----+--------------+------------------+----------------+---------+------------+--------------------+---------+---------+
Add Storage nodes to the specified Zone
ADD HOSTS <ip>:<port> [,<ip>:<port> ...] INTO ZONE <zone_name>;
- After enabling the Zone feature, you must include the
INTO ZONEkeywords when executing theADD HOSTScommand; otherwise, adding a Storage node fails. - A Storage node can belong to only one Zone, but a single Zone can encompass multiple different Storage nodes.
For example:
nebula> ADD HOSTS 192.168.8.111:9779,192.168.8.112:9779 INTO ZONE az1;
Balance the partitions within each Zone
BALANCE DATA IN ZONE;
Note
Specify a space before executing this command.
After enabling the Zone feature, run BALANCE DATA IN ZONE to balance the partitions within each Zone. For more information, see Storage load balance.
Migrate partitions from the Storage nodes in the specified Zones to other Storage nodes
BALANCE DATA IN ZONE REMOVE <ip>:<port> [,<ip>:<port> ...]
Note
- You must specify a space before executing this command.
- Make sure that the number of other Storage nodes is sufficient to meet the set number of partition replicas. When the number of Storage nodes is insufficient, the removal will fail. Run
SHOW JOBS <job_id>to view the status of the removal task. WhenFINISHEDis returned, the removal task is completed.
For example:
nebula> USE my_space_1;
nebula> BALANCE DATA IN ZONE REMOVE 192.168.8.111:9779;
+------------+
| New Job Id |
+------------+
| 34         |
+------------+

# To view the status of the removal task:
nebula> SHOW JOBS 34
+--------+----------------+------------+----------------------------+----------------------------+
| Job Id | Command        | Status     | Start Time                 | Stop Time                  |
+--------+----------------+------------+----------------------------+----------------------------+
| 33     | "DATA_BALANCE" | "FINISHED" | 2023-09-01T08:03:16.000000 | 2023-09-01T08:03:16.000000 |
+--------+----------------+------------+----------------------------+----------------------------+
Drop Storage nodes from the specified Zone
DROP HOSTS <ip>:<port> [,<ip>:<port> ...];
Note
- You cannot directly drop a Storage node that is in use. You need to first drop the associated graph space before dropping the Storage nodes. See drop space for details.
- Make sure the number of remaining Storage nodes outnumbers or equals that of Zones after removing a node, otherwise, the graph space will be unavailable.
For example:
nebula> DROP HOSTS 192.168.8.111:9779;